Troubleshooting your DSP5 or SOTF Switch (NOT for a CSP5 or CCV switch!!)
First thing, try it.
With some tunes it may be obvious that turning the switch changes the tune, with others, you may have to find a nice piece of road and put your foot on the floor. If the tune or power level changes when you turn the switch, it's working.
Make sure the switch is installed correctly. If it's a Duramax make sure you counted correctly and found the correct holes. Most of the connectors have only 2 pins so it's hard to mess up. Make sure the pins are fully inserted and stick out far enough to connect. It does not matter which wire goes to which location on a switch with two wires. If it's an orange/white switch make sure the T-taps are correctly installed and that both ends are making contact.
Check to see if there is a button on the back of the switch. If so, with the key on, press the button at each position and note the results. When you press the button a small LED may light up. It should be brightest in position one (fully counter-clockwise) and dimmest or off in position five (fully clockwise). Except for some Fords which will be bright in both positions one and five. There should only be five positions. If that happens then the switch is probably installed correctly and working properly.
If you still think it's not working, or you have a switch without a button on the back, you can test the switch with a voltmeter across the wires with the key on. You can get to the wires from the back of the switch. Starting in position one you should see a voltage, most commonly 5V DC or so, and then as you go from position one to position five, the voltage should drop. If that happens then the switch is probably installed correctly and working properly. If instead of 5V in position one, you get 7V, you have inserted at least one of the wires in the incorrect hole. this seems to come up in LBZs and LMMs. If that's the case there is a picture lower down this page showing the correct location of the wires in the LBZ/LMM connector.
If you still think it's not working, you need to ask your tuner how to scan your truck so you can see the ECM input the switch is connected to so you can confirm nothing happens when you turn the switch. This is different depending on what kind of truck you have and how your truck was tuned.
If the light is bright in all the positions, you've likely trapped the switch on the wrong side of the tabbed washer. To fix this, remove the nut, lock washer and tabbed washer from the switch. Turn the switch fully counter-clockwise and then put the tab of the tabbed washer in the fifth little hole. Now turn the switch clockwise counting each click until it hits the tabbed washer. If it moves four clicks and then stops, replace the lock washer and nut and start over from step one. If it moves a different amount, turn it back fully counter-clockwise, move the tab to a better position and try again. Sometimes a small tweezers makes it easier to place the washer in the proper location.
To test the switch out of the truck, attach a meter set to the 20K ohms scale. If it's auto-ranging then just select ohms. The first position will normally measure open, i.e., no connection. The next four will each be lower than the one before it. If you get to position 6-12, the switch will measure open again. For the few switches that don't measure open in position one, they will behave the same. Position one will be the highest resistance and each step after that will be lower.
It is possible to separate the two halves by using excessive force installing the knob or hitting or kicking the knob after it's installed. If this happens, try to find the two small ball bearings and the tiny spring. If you have those it can usually be re-assembled without too much trouble. If you don't find those three pieces, you'll need a new switch.
Watch the video HERE
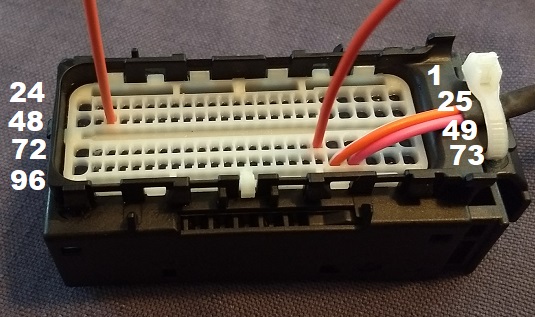
LBZ/LMM Pin Numbers
I picked orange so it would be easy to see and then discovered the harness itself has an orange wire. So the 2 orange wires wires pointing up are the holes you want to put your wires in. It does not matter which wire goes in which hole. Ignore the orange and pink wires at the lower right corner of the connector. The 2 pins go in the holes numbered 46 and 54