Pin Numbers For Your DSP5 Switch
LB7
Blue connector, pin 69
Blue connector, pin 49
LLY
Grey connector, pin 32
Grey connector, pin 50
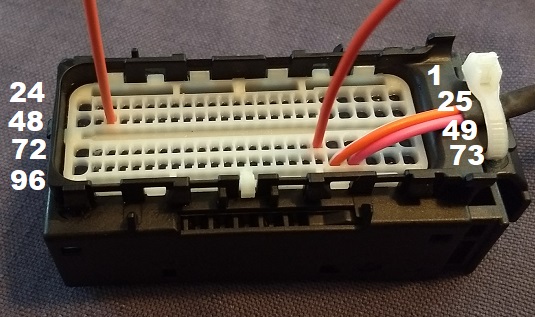
LBZ & LMM
Connector 1 (larger one), pin 46
Connector 1 (larger one), pin 54
PLEASE NOTE: If you have an LML (our yellow/black, blue/white or EGR Temp switch) please check with your tuner for installation instructions.
Please place the pins in the indicated holes. It does not matter which pin goes in which hole.
After you've placed the pins in the connector and plugged the connector back in, turn on the ignition and press the small button on the back of the switch. If one of the LEDs light up, the pins are probably installed in the proper holes.
Your DSP5 switch has a nut and two washers. The bottom smooth washer must remain on the bottom with the tab located in hole number five. If it falls out, turn the switch fully counter clockwise and place the washer back with the pin in hole five. Make sure the switch moves exactly four clicks clockwise. If not, turn the switch back fully counterclockwise, move the pin and try again.
- Please do not cut a pin off a wire and ground it.
- Please loosen set screw before installing knob.
- Please note: square or rectangular pins only go in one way.
- IMPORTANT: please do not use excessive force when installing knob.
I picked orange so it would be easy to see and then discovered the harness itself has an orange wire. So the 2 orange wires wires pointing up are the holes you want to put your wires in. It does not matter which wire goes in which hole. Ignore the orange and pink wires at the lower right corner of the connector. The 2 pins go in the holes numbered 46 and 54